
How to Make a Chicken Coop
How to Make a Chicken Coop
I’ve been raising laying hens for more seasons than I care to count, and I’ve built coops out of just about everything but duct tape and chewing gum. If you want to learn how to make a chicken coop that actually works in real, muddy, windy, egg-filled life, you’re in the right place.
We’ll walk through sizing, layout, ventilation, predator-proofing, and simple day‑to‑day tricks that keep your birds laying and you from cursing every morning. No fancy talk, just straight farmer wisdom and a few honest laughs along the way.
Let me browse
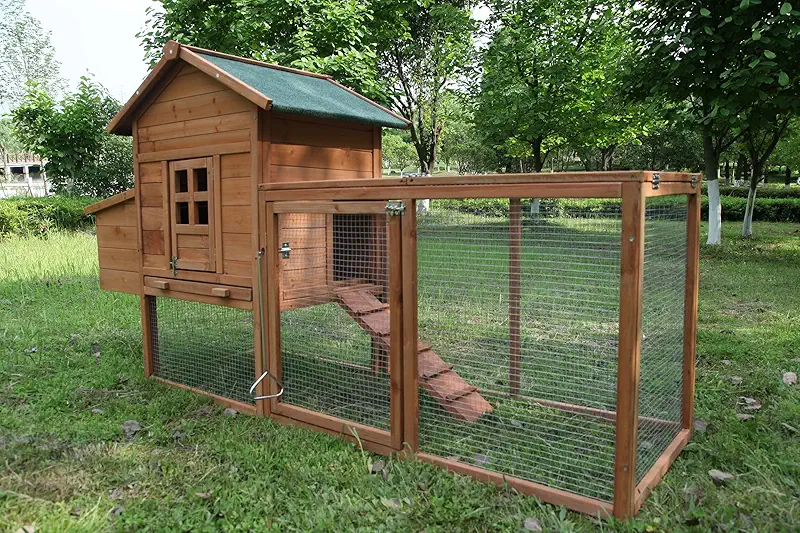
Start With the Hens, Not the Hammer
When folks ask me how to make a chicken coop, they usually start with the tools: “Do I need a nail gun? What lumber should I buy?” I always steer them back to the birds. Your hens don’t care what you built it with. They care if they’re dry, safe, and comfortable.
Years ago I slapped together my first coop in a weekend from whatever scrap wood I had. It looked cute from the driveway, like something from a picture book. Inside, though? Drafty, crowded, and the roosts were right over the nest boxes. The hens told me what they thought of it by decorating the nests with droppings and refusing to sleep where I wanted them to. That’s when I realized the birds design the coop. The lumber just follows orders.
So before you draw a single line, answer these three simple questions:
- How many hens do I want now, and how many will I probably want in a year?
- Is my yard wet, windy, wooded, or wide open?
- Do I want to walk inside the coop, or am I fine bending and crawling?
Once you know that, learning how to make a chicken coop is mostly matching good basics to your birds and your yard.
Space: How Big Should Your Chicken Coop Be?
Overcrowding is one of the fastest ways to turn friendly hens into a bunch of feathered bullies. You don’t need a barn the size of Texas, but you do need honest space.
My simple rule of thumb:
- Inside the coop: 3–4 square feet per hen.
- Outside run: 8–10 square feet per hen (more is always better).
So, for 6 hens, you’re looking at about 18–24 square feet inside. That could be a coop that is 4x6 feet, or 3x8 feet. Whatever fits your yard and materials.
Little farmer trick: once you decide on a number of hens, secretly plan for two more. “Chicken math” is real. You see one more pretty breed and, well, suddenly you’re building an addition.
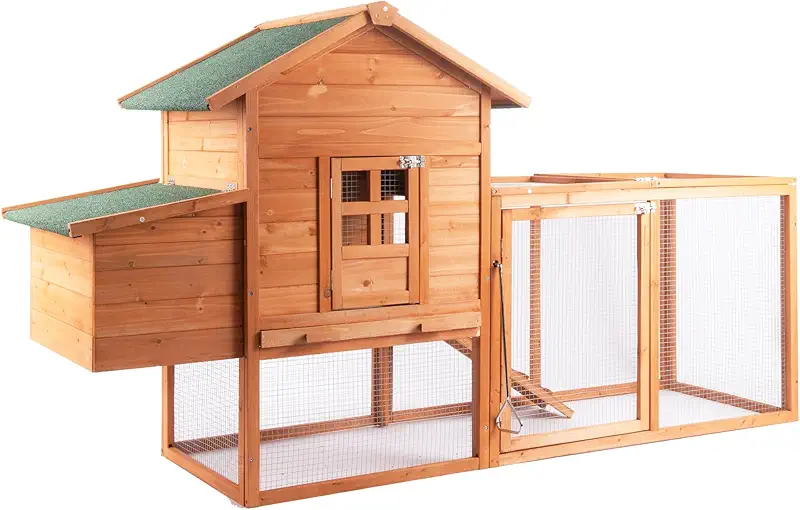
Remember, roost bars, nest boxes, feeders, and waterers all eat up space too. When you’re thinking about how to make a chicken coop layout, picture yourself inside on a cold, wet day trying to collect eggs and refill water. Can you move around without bumping your head or stepping on a hen? If not, adjust the plan before the first board goes up.
Choosing the Right Spot for Your Coop
The best coop in the world can still be a headache if you park it in the wrong spot. I learned this the muddy way when I built my second coop at the bottom of a slight slope. Looked cute and convenient until the first big spring rain turned it into Lake Cluckington.
When you think about how to make a chicken coop work with your land, keep these points in mind:
- High and dry: Avoid low spots where water pools. Damp coops mean sick birds.
- Morning sun, afternoon shade: East-facing doors catch nice morning light and warmth.
- Close, but not too close: You want it near enough for easy daily care, but not right under your bedroom window if you value quiet mornings.
- Wind direction: Put the solid wall toward your strongest winter winds and your main ventilation on the leeward side.
If your yard is small, that’s alright. Many of the smaller ready-made coops I’ve seen are designed for tight spaces and can be tucked along a fence or behind a shed. It’s less about size and more about smart placement.
Framing and Materials: Build to the Chickens, Not to the Catalog

You don’t need fancy lumber to make a good chicken coop. Strong, simple, and weather‑resistant wins every time. Here’s how I look at it:
Wood
Regular framing lumber works fine if you keep it off the ground. Pressure-treated wood is handy for skids and base runners where moisture is an issue. For the walls, I like simple plywood or boards with decent exterior paint.
Roof
Metal roofing lasts a long time but can be noisy in heavy rain. Shingles look nice but take more time. The hens don’t care. Just give them:
- Good slope so water runs off.
- No leaks along the ridge.
- A bit of shade under the roof in summer.
Floor
I’ve used dirt floors, wood floors, and wire floors. The one I come back to most is a solid wood floor raised off the ground a bit. It keeps things drier and is easy to cover with bedding and clean out.
When learning how to make a chicken coop from scratch, remember: overbuilding a little costs you less than rebuilding after the first big storm. Use enough screws, brace the corners well, and don’t skimp on the base.
Ventilation: Fresh Air Without Freezing Your Hens
I once visited a neighbor’s “fancy” coop. It was tight as a drum, insulated like a cooler, and smelled like one too after a week in July. Chickens breathe out a lot of moisture, and that moisture has to go somewhere besides into their lungs and bedding.
A big part of how to make a chicken coop healthy is good, simple ventilation:
- High vents: Openings up near the roofline let warm, moist air drift out.
- Protected openings: Cover vents with 1/2" hardware cloth, not flimsy chicken wire.
- Cross‑breeze, not a draft: Air should move above the hens on the roosts, not straight across their backs.
In cold states, folks often worry more about temperature than moisture. Truth is, dry chickens handle cold better than damp chickens handle slightly warmer but wet air. I’ve had hens scratch happily on days when I could see my breath as long as the coop was dry and out of the wind.
Roosts and Nest Boxes: Give Hens Their Own “Furniture”
Roost Bars
Chickens like to sleep up off the ground. It makes them feel safe. Round or gently rounded 2x2 or 2x4 boards work well. I like to set the wide side up in cold climates so they can sit on their feet and keep them warm.
- Allow about 8–10 inches of roost space per hen.
- Keep roosts all at the same height to avoid squabbles.
- Place them higher than the nest boxes so the birds don’t decide to sleep in the nests.
Nest Boxes
For eggs that come out clean and easy to collect, nest boxes matter. My standard is:
- One nest box for every 3–4 hens.
- Size around 12" x 12" x 12".
- Front lip 3–4" high to keep bedding in.
And here’s a little truth: even with six nest boxes, you’ll still find three hens trying to use the same favorite box at once. Chickens are like that.

When you plan how to make a chicken coop interior, think of it like setting up bunk beds and private reading nooks. Sleeping area high and clean, quiet corners for laying, traffic paths where you can walk without ducking every two steps.
Predator-Proofing: Because Everything Likes Chicken
Out here, I say, “If it walks, crawls, flies, or slithers, it probably likes chicken.” Raccoons, foxes, dogs, hawks, owls, rats, even the occasional weasel — they all see your hens as an all‑you‑can‑eat buffet.

Learning how to make a chicken coop predator‑proof is just as important as learning how to frame walls. Here’s what I insist on:
- Hardware cloth, not chicken wire: Chicken wire keeps chickens in. It does not keep hungry critters out. Use 1/2" hardware cloth for windows, vents, and runs.
- Buried or flared fencing: Bury the wire 6–12 inches down, or flare it out flat on the ground around the run to stop diggers.
- Solid latches: Raccoons have hands like little burglars. Use locking latches, not just simple hook-and-eye.
- Closing doors: Automatic pop doors can save you if you forget, but I still like the habit of a quick evening walk to say goodnight to the flock.
It doesn’t take much extra time or money to build these things in when you first make your chicken coop, and it’ll save you a lot of heartache later.
Flooring, Bedding, and Cleaning: Keeping the Coop Fresh
A coop doesn’t need to smell like a perfume shop, but it shouldn’t knock you over either. When folks ask how to make a chicken coop that doesn’t stink, I tell them it’s mostly about dry bedding and a simple routine.
My go‑to setup:
- Floor: Solid wood or raised platform covered with a few inches of pine shavings or chopped straw.
- Droppings board: A board or tray under the roosts that catches most of the nightly mess.
- Spot cleaning: Scoop droppings board and any wet spots every few days.
- Deep clean: Full bedding change a few times a year, more if it’s very damp.
Some folks like the deep litter method — adding clean bedding on top and letting the lower layers compost over time. Done right, it works well and keeps the coop warmer in winter. Done wrong, it turns into a soggy disaster. If you’re new to chickens, start simple, then ease into deeper litter once you get a feel for moisture and ventilation.
Feeders, Waterers, and Daily Workflow
A good chunk of learning how to make a chicken coop is just planning how you’ll move through your chores without spilling feed, tripping over buckets, or banging your head every morning. Ask me how I learned that last one.
Place your gear with these in mind:
- Easy in, easy out: Put feeders and waterers where you can reach them without stepping into the messiest part of the coop.
- Reduce waste: Hanging feeders at back height for the birds keeps them from scratching it out.
- Clean water: Keep waterers out of the main traffic and scratching zones so they don’t fill up with bedding.
If all this sounds like a lot to figure out, ready-made coops and hardware that are already laid out can take a big chunk of guesswork off your shoulders. You’re still caring for your flock, just starting from a solid base instead of reinventing the wheel.

I like to be able to visit the coop in my slippers, grab eggs, top off water, and be back in the house in five minutes if the weather is ugly. If your coop makes that easy, you’ve done something right.
Weather-Proofing for Hot Summers and Cold Winters
Whether you’re up in snowy country or down where summers feel like living inside a hair dryer, how to make a chicken coop that handles weather is a big piece of the puzzle.
In Hot Weather
- Design plenty of shade and airflow, especially on the west and south sides.
- Use light-colored roofing to reflect sun if you can.
- Make windows or panels that can open wide in summer and close in storms.
In Cold Weather
- Focus on blocking drafts at bird level, not on sealing the coop tight.
- Use deeper bedding for insulation.
- Make sure water doesn’t freeze — heated bases or swapping buckets twice a day both work.
I’ve seen simple wooden coops with good bedding and ventilation outperform fancy “insulated” boxes that didn’t breathe. The secret when you’re figuring out how to make a chicken coop for your climate is balance: dry, draft‑free, but always with fresh air moving through the top.
Building vs. Buying: Honest Talk From a Tired Farmer

I enjoy building. I also enjoy having a back that doesn’t complain every time I stand up. There’s no prize for building everything from scratch, and there’s no shame in wanting a solid pre‑made setup.
When you’re weighing how to make a chicken coop yourself against starting with a kit, think about:
- Your tools and skill level.
- How many weekends you honestly want to spend measuring and cutting.
- How soon you want those first fresh eggs.
Many ready-made coops and runs today are designed with most of what we’ve talked about already in mind — roosts, nests, vents, doors, and easy cleaning. You can set one up, then customize it to your flock instead of inventing the whole wheel after work.
If that sounds more your speed, taking a quiet stroll through different coop options can spark ideas, even if you still decide to build your own later.
Frequently Asked Questions About How to Make a Chicken Coop
For a small backyard, I’d start with 3–6 hens. That gives you a steady basket of eggs without crowding. Inside the coop, aim for 3–4 square feet per bird, and 8–10 square feet per bird in the run. If your space is tight, it’s better to keep fewer hens and keep them comfortable than squeeze in too many and fight pecking and health problems.
Strictly speaking, you can get by without one, but I sure sleep better with some kind of cover over the run. A roof or even strong netting helps keep out hawks and owls, keeps wild birds from dropping in, and cuts down on mud when it rains. Where I live, a covered run also keeps the hens from staring at snowflakes like the world is ending every winter.
It depends on your time, tools, and patience. If you enjoy projects and already have saws, drills, and a free weekend or three, building your own can be satisfying and flexible. If the idea of trying to square up walls after work sounds exhausting, a ready-made coop or kit can put you much closer to the finish line. Many people start with a solid kit and then add touches — better latches, extra vents, a bigger run — as they learn what their hens need.
Smell comes from wet, not from chickens. To keep your coop from getting ripe, focus on three things: dry bedding, good airflow, and a simple cleaning habit. Use absorbent bedding like pine shavings, make sure you have vents high up for moisture to escape, and scrape droppings from under the roosts every few days. It takes just a couple of minutes and makes a world of difference.
Most beginners either build too small or forget about predators. It’s easy to fall for a cute little design that looks nice in pictures but is cramped in real life. It’s just as easy to trust chicken wire and simple hooks until the night something hungry comes visiting. Give your birds generous room, especially on the roost, and use solid hardware cloth and latches. Those two choices alone put you years ahead on the learning curve.
Bringing It All Together
Now you’ve walked through the real nuts and bolts of how to make a chicken coop: size, placement, framing, ventilation, roosts, nests, predator‑proofing, and daily living for both you and the birds. It’s a lot on paper, but in real life it all fits together like a simple puzzle.
Picture a dry, well‑ventilated little house, with your hens lined up on a sturdy roost, crops full, feathers fluffed, and not a care in the world. That’s the goal. Whether you cut every board yourself or start from a coop that comes in a few big pieces, what matters is that the birds are safe and you can care for them without turning every morning into a chore marathon.
If your head is already spinning with designs, grab a scrap of paper and sketch out where the roosts, nests, door, and windows will go. If instead you’re thinking, “I’d rather see some finished ideas first,” that’s fine too. Sometimes it helps to look at a bunch of existing coops to see what makes sense for your yard and your flock.
